Progressive JPEGs: The Forgotten Optimization That Still Matters
Summary
Progressive JPEGs show a full-image blurry preview instantly, then sharpen. They're 2–8% smaller than baseline and make images feel faster. Here's how to use them.
You've compressed your hero image to 150 KB, set fetchpriority="high", and the LCP is still 2.8 seconds on 4G. The image downloads, but it feels slow, because baseline JPEG rendering is top-to-bottom, and on a slow connection the bottom half of the image remains blank while the top loads in. The page looks broken.
Progressive JPEG encoding fixes this perceptual problem without any additional compression. The image shows a complete blurry preview in the first pass, users see the full composition immediately, then sharpens in subsequent passes as more data arrives. For the same quality setting, progressive is also 2–8% smaller than baseline for images above about 10 KB. It's one of the most impactful, most overlooked optimisations in image delivery.
Baseline vs. Progressive JPEG: The Technical Difference
Both are valid JPEG files. The difference is in how image data is ordered within the file:
Baseline JPEG stores image data as a sequence of rows from top to bottom. The browser paints each row as it receives the data. On a fast connection, this is invisible. On a slow connection or with a large file, the image paints progressively from top to bottom, users see half an image while waiting for the rest.
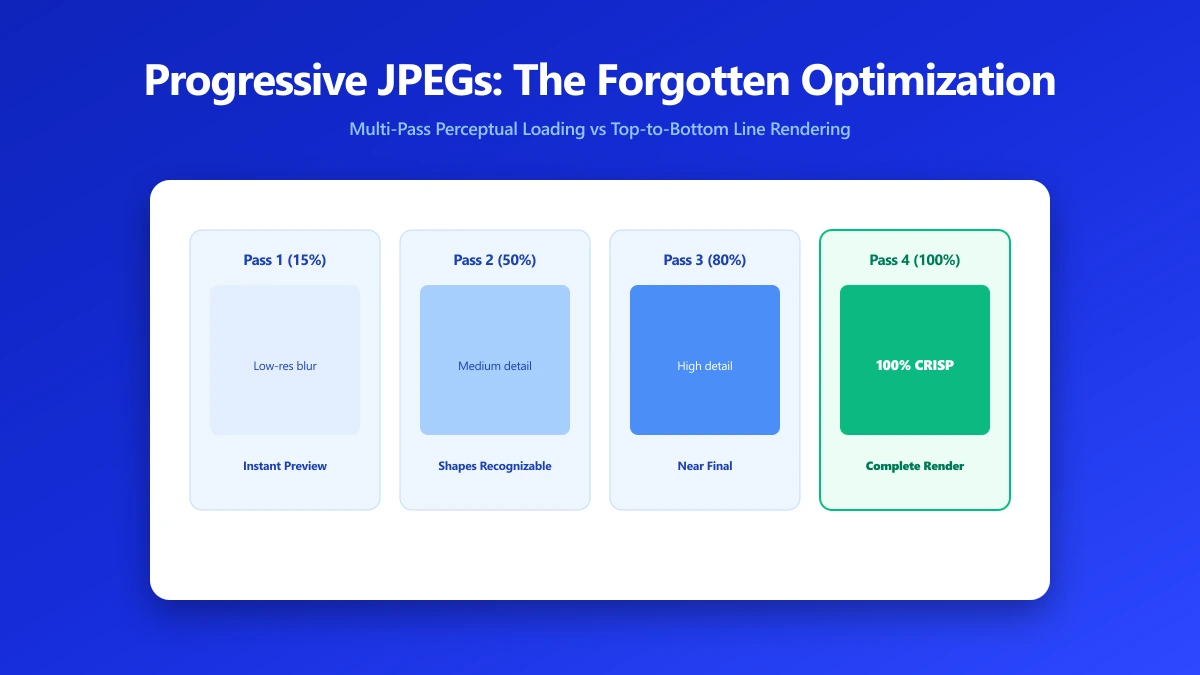
Progressive JPEG stores the image as multiple scans, each covering the entire image at increasing levels of detail. Scan 1 contains a very low-resolution (but complete) version of the full image. Scan 2 adds medium-frequency detail. Scan 3 and beyond add high-frequency detail. The browser can display the complete image, blurry but recognisable, after receiving only the first scan (typically 5–15% of the file).
Progressive JPEG is a perceptual optimisation first and a size optimisation second. The perceived quality difference, seeing the full image vs. a blank area, is significant on slow connections. The size difference (2–8% smaller for large images) is real but secondary. Both benefits come for free at encode time.
File Size: Progressive vs. Baseline at the Same Quality
| Image size | Content type | Baseline size | Progressive size | Saving |
|---|---|---|---|---|
| 200×200px (thumbnail) | Portrait photo | 12 KB | 13 KB | −8% (baseline wins) |
| 800×600px | Landscape photo | 85 KB | 80 KB | +6% |
| 1200×800px (hero) | Mixed content | 180 KB | 168 KB | +7% |
| 2000×1333px (full quality) | Portrait photo | 450 KB | 418 KB | +7% |
| Flat UI screenshot | 800×600px | 110 KB | 115 KB | −5% (baseline wins) |
The crossover point is roughly 10 KB. For thumbnails and small images, baseline is sometimes smaller. For anything above 50 KB, hero images, product photos, article images, progressive is almost always smaller and always perceptually better on constrained connections.
How Progressive JPEG Decoding Works in the Browser
When a browser receives a progressive JPEG, it decodes and displays each scan as it arrives. Scan 1 is displayed immediately when the initial data arrives, this might be after receiving only 5–20% of the bytes. The image appears complete (if blurry). Subsequent scans update the display, sharpening the image in real time as data streams in.
This is fundamentally different from baseline JPEG, where the browser must receive all the bytes for a given row before it can paint that row. On a page with a 300 KB hero image loading over a 5 Mbps connection (slow 4G), baseline shows the top 30–40% of the image for a noticeable pause, then snaps to full quality. Progressive shows the full composition immediately at low quality, then sharpens seamlessly, the same bytes, dramatically different user experience.
How to Encode Progressive JPEGs
# jpegtran, losslessly convert existing JPEG to progressive
# No quality change, just re-orders the scan structure
jpegtran -progressive -copy none input.jpg output-progressive.jpg

# ImageMagick, convert to progressive during resize or quality change
magick convert input.jpg -interlace Plane -quality 80 output-progressive.jpg

# cjpeg (libjpeg-turbo), encode from source with progressive flag
cjpeg -progressive -quality 80 -outfile output.jpg input.ppm

# Sharp (Node.js), progressive flag in the JPEG output options
sharp('input.jpg')
  .jpeg({ quality: 80, progressive: true })
  .toFile('output-progressive.jpg');

# Verify progressive encoding with ImageMagick identify:
identify -verbose output.jpg | grep Interlace
# Interlace: Plane = progressive
# Interlace: None  = baseline
Progressive JPEG in Build Pipelines
Most modern image processing pipelines support progressive encoding as a flag. The key is ensuring it's enabled where your JPEG files are produced, not just locally:
- ●Webpack / Vite (imagemin-mozjpeg): Set
progressive: truein the plugin options - ●Gulp (gulp-imagemin):
imageminMozjpeg({ progressive: true, quality: 80 }) - ●Cloudinary CDN: Add
fl_progressiveto the transformation URL - ●Imgix CDN: Add
fm=pjpgto the request URL - ●Cloudflare Images: Progressive output is enabled by default in their pipeline
- ●Lightroom Classic: Export → Format: JPEG → check "Save as progressive scan"
Browser and CDN Support for Progressive Decoding
All modern browsers (Chrome, Firefox, Safari, Edge) support progressive JPEG decoding. The progressive scan order is transparent to the browser, it displays each scan as it arrives, regardless of whether the developer is aware of it. There is no CSS or JavaScript needed to enable progressive rendering; it's built into the JPEG format and the browser's image decoder.
CDN caveats: some CDNs strip progressive encoding when transcoding JPEGs. Cloudflare, Cloudinary, and Imgix all preserve or can re-add progressive encoding. AWS S3 + CloudFront does not transcode, it serves whatever you upload. If your CDN processes images, check that progressive encoding is preserved or can be enabled in the CDN's image optimisation settings.
Progressive JPEG vs. Blur-Up Placeholder Techniques
A popular alternative to progressive JPEG is the "blur-up" placeholder technique: serve an inline base64 SVG or very small JPEG as an immediate placeholder, then load the full image lazily. Next.js uses this by default for blurred placeholder images. The result is similar, the user sees something immediately, but it requires JavaScript and additional markup.
Progressive JPEG achieves the same perceptual effect without JavaScript, without additional markup, and without a separate placeholder image. For static sites and non-React pages, progressive encoding is the simpler solution. For React and Next.js apps, the blur-up technique is often already built in; use progressive encoding as well for any JPEG that isn't handled by the framework's Image component.
When Progressive JPEGs Are Not Worth It
- ●Thumbnails under 20 KB: Images this small load in under 50ms even on slow connections, the progressive effect isn't perceptible and baseline may be slightly smaller
- ●Already-WebP images: WebP doesn't have a "progressive" mode in the same sense; use incremental decoding instead, which modern browsers handle automatically
- ●Images below the fold with lazy loading: These load on scroll, when the user is already engaged, the progressive effect is less meaningful than for above-fold content
- ●PNG and GIF: Progressive encoding is a JPEG-specific technique; PNG uses "Adam7" interlacing for similar effect but the benefit is smaller
Bottom Line
Progressive JPEG is a low-cost, high-leverage optimisation. It requires adding one flag at encode time, costs nothing at delivery time, and improves both perceived load speed and actual file size for images above 50 KB. For any site serving large hero images or galleries over JPEG, enabling progressive encoding across the pipeline is one of the few true free wins in image performance. Start with your hero images, compress them first to reduce the total bytes, then convert to progressive to improve the experience as those bytes arrive.
Frequently asked questions
What is a progressive JPEG?
Are progressive JPEGs smaller than baseline JPEGs?
How do I convert a JPEG to progressive encoding?
Do all browsers support progressive JPEG?
Should I use progressive JPEG or WebP?
Sources & references
This article was researched and written by Nikola, drawing on the following primary sources and documentation:
Ready to try it?
All tools run entirely in your browser, no uploads, no account required.
Compress Image