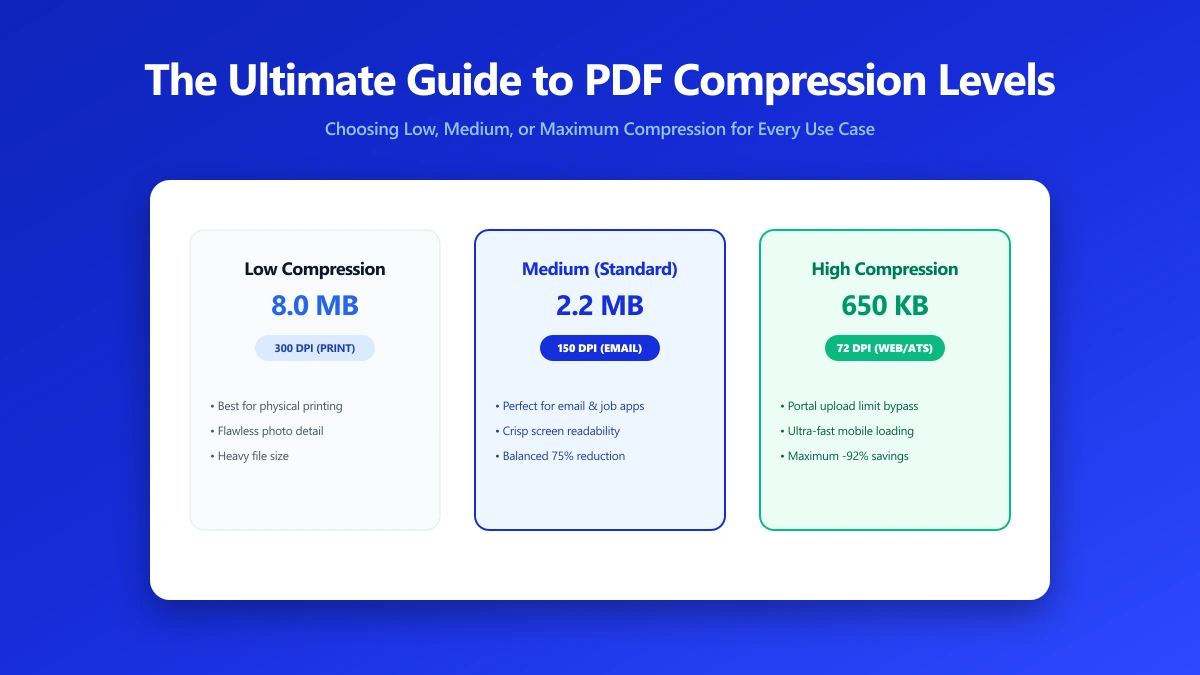
The Ultimate Guide to PDF Compression Levels
Summary
Screen, eBook, Printer, Prepress, what these PDF compression presets actually do, which to use for email vs print, and how to shrink any PDF without ruining quality.
You need to send a PDF by email but it's too large. You open a PDF compressor and see four options: Screen, eBook, Printer, Prepress. You pick one, probably the one that sounds most reasonable, and hope the output is usable. Most people make this choice without understanding what each setting actually does to their file.
Pick too aggressive a setting and your PDF comes out soft and pixelated, unreadable at print and embarrassing to send to a client. Pick too conservative a setting and the file barely shrinks, you're still over the email limit, and you compress it again, compounding quality loss with every pass.
This guide explains exactly what each preset does at a technical level, what types of PDFs compress well and which don't, and how to make the right choice for your specific situation. If you need the quick answer, our PDF compressor handles all of this in your browser, no upload required.
What PDF Compression Actually Compresses
Most PDF file size comes from embedded images, rasterised photographs, scanned pages, and graphics. Text and vector elements (shapes, paths, fonts) are already efficiently stored and compress very little. Understanding what is inside your PDF tells you how much compression to expect.
PDF compression works through several simultaneous operations:
- 1.Image downsampling, embedded images are resized to a lower DPI target (pixels per inch). A 600 DPI scan becomes 150 DPI; file size drops roughly by the square of the DPI ratio.
- 2.JPEG recompression, the downsampled image data is re-encoded as JPEG at a lower quality. This is where the most dramatic size reduction happens, and where quality can be irreversibly lost.
- 3.Flate/ZIP compression, text streams, vector paths, and font data are compressed losslessly with Deflate. This is always applied and has no quality impact.
- 4.Font subsetting, only the character outlines actually used in the document are kept. Full embedded fonts are stripped and replaced with minimal subsets.
- 5.Metadata and overhead removal, comments, unused form fields, object streams, colour profiles, and container overhead are stripped.
For scanned PDFs (pages photographed or copied as images), compression can shrink the file by 60–80% with no visible quality loss at normal reading zoom. For PDFs from Word, InDesign, or Excel with mainly vector content, the reduction is typically 20–40% and quality is less of a concern.
The Four Presets, Explained
The Screen / eBook / Printer / Prepress naming comes from Ghostscript's -dPDFSETTINGS flag, defined in the early 2000s and since adopted by virtually every PDF tool, Adobe Acrobat, ilovepdf, Smallpdf, and most CLI utilities.
| Preset | Image DPI Target | JPEG Quality | Typical Size Reduction | Best For |
|---|---|---|---|---|
| /screen | 72 DPI | ~35 | 70–85% | On-screen reading only; smallest file |
| /ebook | 150 DPI | ~60 | 50–75% | Email, web uploads, internal sharing |
| /printer | 300 DPI | ~80 | 20–50% | Office printing, high-quality sharing |
| /prepress | 300 DPI | lossless where possible | 5–30% | Print shops, publishers, archives |
| /default | No change | No change | 0–15% | Lossless overhead reduction only |
/screen, Maximum Compression
Downsamples all images to 72 DPI and recompresses at JPEG quality ~35. This is the setting designed for images that will only ever be viewed on screen at reduced zoom. At 100% zoom, photos will show visible JPEG artefacts and text in images may look jagged.
Use /screen when: you need to get a file under a strict size limit (1 MB email, web upload) and the document will never be printed or zoomed closely. Do not use it for: documents with small-print text, contracts or forms where legibility matters, anything that will be printed, or any document containing photos where quality matters.
/ebook, The Practical Sweet Spot
Downsamples images to 150 DPI and recompresses at JPEG quality ~60. This is the recommended setting for most everyday use cases. Text is sharp and readable on screen. Photos look good at reading zoom. The document prints acceptably on standard office printers at normal reading distance.
Use /ebook for: email attachments, documents uploaded to a web portal, internal reports shared via Slack or Google Drive, PDFs embedded in presentations, most client deliverables where professional print quality is not required.
/printer, High Quality
Preserves images at 300 DPI and recompresses at JPEG quality ~80. This is the standard print quality threshold, documents produced at 300 DPI look sharp when printed on office laser printers and most photo printers. File sizes are 2–5× larger than /ebook.
Use /printer for: documents that will be physically printed, PDF portfolios with photos, any deliverable where the recipient might print it, technical documents where figure readability at print is important.
/prepress, Publication Quality
Preserves images at 300 DPI with lossless compression where possible. Colour profiles (ICC profiles) are embedded and preserved. Object-level metadata is retained. This setting assumes the document will go to a commercial print shop or publisher where colour accuracy and lossless fidelity are requirements.
Use /prepress for: sending files to a print shop, book or magazine layout files, anything where a designer or printer needs to work with the PDF downstream, professional photography portfolios.
What Compresses Well, and What Doesn't
| PDF Content Type | Expected Reduction (/ebook) | Notes |
|---|---|---|
| Scanned document (image-only pages) | 60–80% | Massive gains from DPI downsampling |
| Photography portfolio | 50–70% | Large embedded JPEGs recompressed at lower quality |
| Slide deck with images | 40–65% | Depends on original image quality |
| Mixed text and images | 30–50% | Text compresses losslessly; images drive savings |
| Word-processed document (text only) | 10–25% | Font and metadata overhead reduction only |
| InDesign / vector-heavy layout | 15–35% | Vector paths already efficient; minimal image savings |
| Already compressed PDF | 5–15% | Diminishing returns; recompressing adds artefacts |
Beyond Presets: Additional Compression Techniques
The standard presets handle image compression and font subsetting. For large PDFs, additional reductions are available through other techniques:
Flatten Transparent Objects
PDFs created from InDesign or Illustrator often contain transparency groups, objects with blending modes stacked over each other. Flattening these into a single layer removes the opacity calculation overhead and can significantly reduce PDF complexity.
Remove Hidden Layers and Form Data
PDFs may contain hidden content layers, unused form field data, attached file streams, and embedded colour profiles that add weight without visible content. Tools like qpdf and ExifTool can target these specifically.
# Ghostscript /ebook preset, best for email and web
gs -sDEVICE=pdfwrite -dCompatibilityLevel=1.5 \
   -dPDFSETTINGS=/ebook -dNOPAUSE -dQUIET -dBATCH \
   -sOutputFile=compressed.pdf input.pdf

# qpdf, strip restrictions, flatten, linearise for web
qpdf --linearize --remove-restrictions input.pdf output.pdf

# ExifTool, remove all PDF metadata without recompressing
exiftool -all= -overwrite_original input.pdf
Never Compress the Same PDF Twice
Each compression pass resamples images that have already been resampled. A 72 DPI image recompressed at JPEG 35 again will be resampled from a lossy source, artefacts compound, and detail that was merely blurred in the first pass becomes smeared or blocky in the second. Always compress from the original source file.
If you've already compressed a PDF and need to compress it further, you have limited options: either accept the additional quality loss, or locate and use the original source document. There is no lossless way to recover quality from a previously compressed PDF.
Quick Decision Guide
- ●Email attachment under 5 MB: /screen or /ebook, choose /ebook unless file size is genuinely the only constraint.
- ●Web download / document portal: /ebook, readable on every device, reasonable size.
- ●Office printing: /printer, the receiver can print without quality concerns.
- ●Print shop or publisher: /prepress, preserve colour profiles and lossless fidelity.
- ●Archive with uncertain future use: /printer or /default, preserve quality; storage is cheap.
- ●Scanned document for internal use: /screen is acceptable; /ebook for anything shared externally.
The Bottom Line
/ebook is the right choice for 80% of everyday PDF compression needs, email, web sharing, internal distribution. It delivers substantial size reduction while keeping text sharp and photos readable. Reserve /screen for when you genuinely need the smallest possible file. Use /printer and /prepress when print quality matters.
Our PDF compressor processes your file entirely in your browser, no upload, no account. You can also merge PDFs before compressing to handle multi-document jobs in one step.
Frequently asked questions
What is the best PDF compression preset for email?
Will compressing a PDF make it blurry?
Can I compress a PDF multiple times?
Why isn't my PDF getting smaller?
What is the difference between /screen and /ebook?
Sources & references
This article was researched and written by Nikola, drawing on the following primary sources and documentation:
Ready to try it?
All tools run entirely in your browser, no uploads, no account required.
Compress PDF