How to Batch Resize Images for Social Media Quickly
Summary
The complete 2026 guide to image dimensions for Instagram, X, LinkedIn, TikTok, YouTube, and more, plus batch resizing methods without quality loss.
You post a photo to Instagram, and the platform crops off the subject's head. You share a graphic on LinkedIn and it appears letterboxed with grey bars. You upload a YouTube thumbnail and it looks blurry on mobile. All of these are the same problem: the image dimensions don't match what the platform expects.
Every social platform has its own display dimensions, aspect ratio, and file size limits, and they differ significantly from each other. Get them right and your visuals display exactly as intended, pixel-perfect at any zoom level. Get them wrong and the platform's auto-processing takes over, cropping or compressing in ways you can't control.
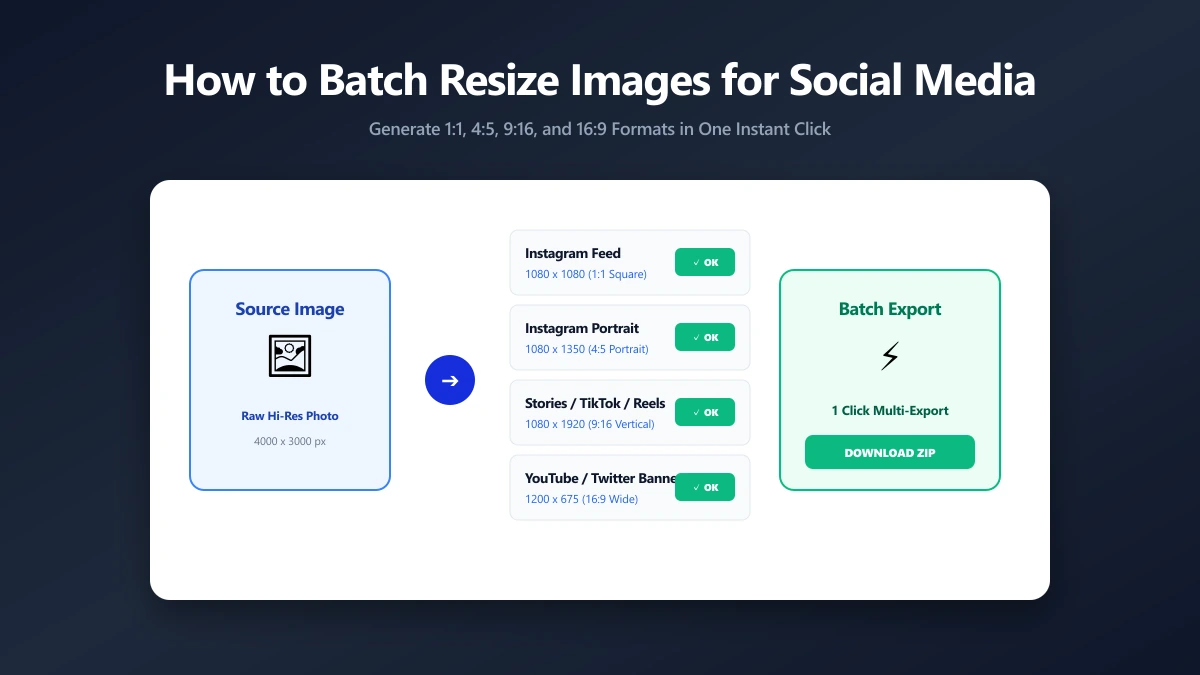
This guide covers every major platform's image dimensions in 2026, explains the correct resize workflow to avoid quality loss, and shows you how to prepare images for multiple platforms in a single batch operation. If you want the quick fix, our image resizer handles exact pixel dimensions in the browser.
2026 Social Media Image Size Reference
| Platform | Format / Use | Recommended Size | Aspect Ratio | File Size Limit |
|---|---|---|---|---|
| Feed – Square | 1080 × 1080 px | 1:1 | 8 MB | |
| Feed – Portrait (best reach) | 1080 × 1350 px | 4:5 | 8 MB | |
| Feed – Landscape | 1080 × 566 px | 1.91:1 | 8 MB | |
| Stories / Reels | 1080 × 1920 px | 9:16 | 8 MB | |
| X / Twitter | In-stream image | 1600 × 900 px | 16:9 | 5 MB (JPEG/PNG) |
| X / Twitter | Profile photo | 400 × 400 px | 1:1 | 2 MB |
| Post image | 1200 × 627 px | 1.91:1 | 5 MB | |
| Cover / banner | 1584 × 396 px | 4:1 | 8 MB | |
| Post image | 1200 × 630 px | 1.91:1 | 30 MB | |
| Story | 1080 × 1920 px | 9:16 | 4 MB | |
| YouTube | Thumbnail | 1280 × 720 px | 16:9 | 2 MB |
| YouTube | Channel art | 2560 × 1440 px | 16:9 | 6 MB |
| TikTok | In-feed image | 1080 × 1920 px | 9:16 | 20 MB |
| Standard pin | 1000 × 1500 px | 2:3 | 32 MB | |
| Square pin | 1000 × 1000 px | 1:1 | 32 MB | |
| Threads | Post image | 1080 × 1080 px | 1:1 or 4:5 | 8 MB |
Portrait format (4:5) on Instagram gets 20% more screen space than square (1:1) in the feed, higher on-screen presence with the same file. For reach-focused content, 1080×1350 is the superior choice.
Why Dimensions Matter More Than Resolution
The pixel dimensions you set matter far more than the DPI value embedded in the file. Social platforms display images at screen resolution, 72–96 PPI depending on the device, regardless of what DPI is embedded. A 300 DPI image exported for social media is no sharper than a 72 DPI image at the same pixel dimensions; it's just a larger file that takes longer to upload.
What causes blurry social images is upscaling, uploading an image that is smaller in pixels than the platform's display size. The platform interpolates the missing pixels, producing a soft result. Always resize to at least the recommended dimensions before uploading. Exceeding the target (e.g., uploading 2160×2160 for an Instagram square) is fine, the platform scales it down, which is lossless.
Crop vs. Letterbox: Choosing the Right Resize Mode
When your source image doesn't match the target aspect ratio, you have two options:
- ●Crop to fill: the image is scaled until the shorter dimension matches the target, then the excess is cut. The entire canvas is filled, but some content is lost. Use for: product photos, headshots, lifestyle imagery where the subject can be centred.
- ●Letterbox / fit: the image is scaled until the longer dimension matches the target, and empty space (usually white or transparent) is added on two sides. No content is lost, but there are visible borders. Use for: infographics, screenshots, images where all content must be visible.
| Content Type | Recommended Mode | Reason |
|---|---|---|
| Portrait / lifestyle photo | Crop to fill | Subject centred; borders look unprofessional |
| Product shot on plain background | Crop to fill | Background fills cleanly |
| Infographic or text graphic | Letterbox | All text must remain visible |
| Screenshot or UI mockup | Letterbox | Cropping changes meaning |
| Landscape photo for square format | Crop (wide centre) | Borders look odd; crop from centre |
| Logo or icon on transparent PNG | Letterbox with padding | Maintain proportions and breathing room |
The Correct Resize Workflow
Quality degrades when you resize or recompress incorrectly. Follow this sequence and your images will be as sharp as the original at every platform:
- 1.Start from the highest-quality source file. Never use a social media download as your master, every platform recompresses on upload, and the download is already a compressed copy.
- 2.Resize to the target dimensions. Use the correct mode (crop or letterbox) for your content type.
- 3.Compress once at the end. After resizing, run through an image compressor at your target file size. Do not compress before resizing, the resize step will undo any size gains.
- 4.Save with a platform-labelled filename. Keeping versions organised (image-instagram.jpg, image-linkedin.jpg) prevents accidentally uploading the wrong version.
Never recompress a JPEG multiple times. Each re-encode adds generation loss. Resize from the original source each time, the resize operation itself does not lose quality (downscaling is lossless in perception).
Batch Resizing with ImageMagick
For bulk jobs, preparing one image for all platforms, or processing an entire folder of product shots, ImageMagick is the fastest CLI tool. It is free, runs on every OS, and handles all resize modes.
# Crop to fill, Instagram square (1080×1080), centre gravity
convert source.jpg -resize 1080x1080^ -gravity Center \
        -extent 1080x1080 instagram-square.jpg

# Letterbox, LinkedIn post (1200×627), white background
convert source.jpg -resize 1200x627 -gravity Center \
        -background white -extent 1200x627 linkedin-post.jpg

# Batch: generate all platform sizes from one source
sizes=("1080x1080" "1080x1350" "1200x627" "1280x720" "1000x1500")
names=("ig-square" "ig-portrait" "linkedin" "yt-thumb" "pinterest")

for i in "\${!sizes[@]}"; do
  convert source.jpg \
    -resize "\${sizes[$i]}^" -gravity Center \
    -extent "\${sizes[$i]}" \
    "output-\${names[$i]}.jpg"
done
File Size Targets and Platform Compression
Every platform recompresses your image on upload, regardless of the file size you send. Uploading a 5 MB JPEG does not mean your followers see 5 MB quality, the platform will reduce it to its internal quality target. Uploading a tightly compressed 300 KB source can produce an output indistinguishable from a 5 MB upload, because both end up going through the same platform re-encode.
Practical targets for what to upload:
- ●Instagram: 150–500 KB at correct dimensions, Instagram recompresses to JPEG ~80 internally; sending a larger file doesn't improve the result.
- ●X / Twitter: Upload at high quality (JPEG 85–90) and let the platform compress. PNG uploads are preserved as PNG if under the size limit.
- ●LinkedIn: Under 1 MB is sufficient for standard post images at 1200×627.
- ●YouTube thumbnails: Under 2 MB (platform limit); 200–500 KB is plenty for a 1280×720 image at JPEG 80.
- ●Pinterest: Under 10 MB; PNG or JPEG both work well for the 1000×1500 format.
Platform-Specific Quirks Worth Knowing
Instagram displays feed images at 1080px wide on high-DPI screens. Uploading at exactly 1080px wide is fine. The platform does not benefit from higher-resolution sources at the feed scale. Stories and Reels at 1080×1920 should have important content kept within the centre 1080×1420px "safe zone", top and bottom 250px may be covered by UI elements.
X / Twitter
X displays two-image posts at a forced 7:8 crop. Four-image posts use a grid with varying crops. If you're posting multiple images in one tweet, the auto-crop may clip your content, use single-image posts for images where exact framing matters.
LinkedIn's algorithm has historically favoured native document uploads (PDF carousels) over single images for reach. For text-heavy content intended for LinkedIn, consider a PDF carousel format rather than a static image post.
The Bottom Line
Match your dimensions to the platform, start from the highest-quality source, resize before you compress, and compress once at the end. This sequence guarantees the sharpest possible output at every platform's display size.
Use our image resizer for exact pixel dimensions, then the image compressor to hit the right file size, both tools work entirely in your browser with no upload.
Frequently asked questions
What image size is best for Instagram in 2026?
Does uploading a larger image improve quality on social media?
How do I resize images for multiple platforms at once?
Why do my images look blurry on social media?
Should I upload JPEG or PNG to social media?
Sources & references
This article was researched and written by Nikola, drawing on the following primary sources and documentation:
Ready to try it?
All tools run entirely in your browser, no uploads, no account required.
Resize Image