How to Convert JPG to PDF Without Losing Quality
Summary
Most JPG-to-PDF tools silently recompress your image, destroying quality. Learn the correct method that embeds JPEG data without re-encoding, zero quality loss.
You convert a JPG to PDF, send it to a client, and they zoom in on the signature or the fine print, and it's soft. Noticeably softer than the original photo. You didn't change any quality settings. What happened?
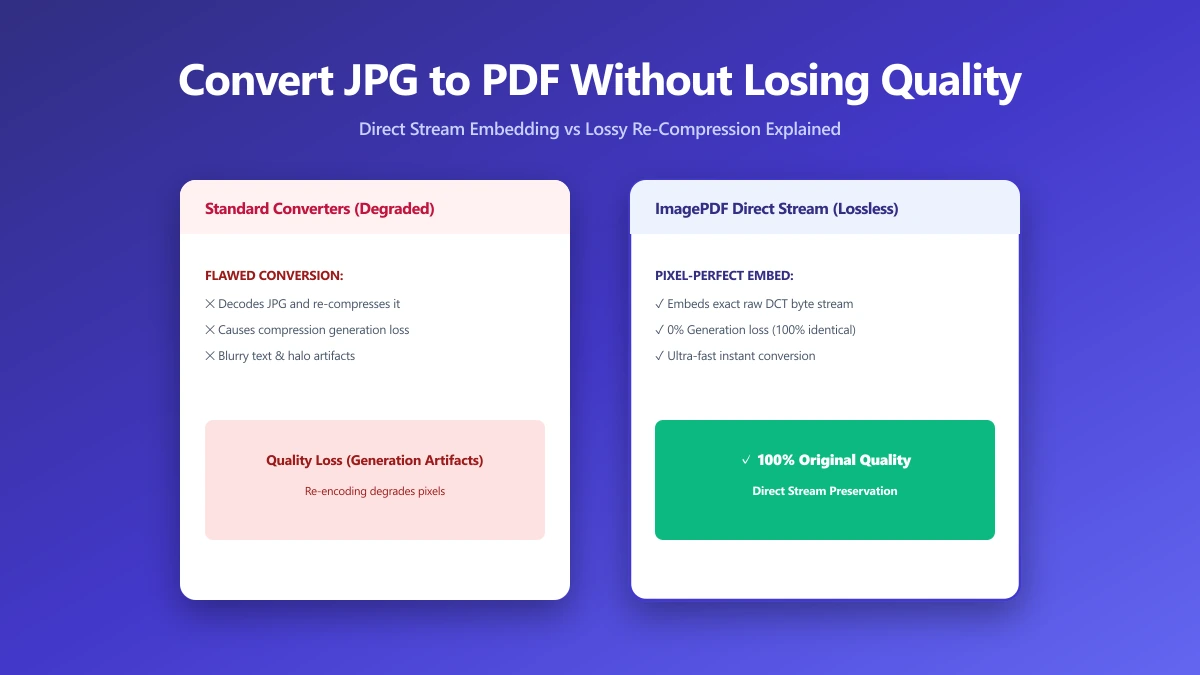
The typical online JPG-to-PDF converter takes your image, runs it through JPEG compression again at whatever internal quality setting the tool uses, and embeds the result. The output looks fine at a thumbnail. At 100% zoom, or when printed, the generation loss is visible.
The correct way to convert a JPG to PDF is to embed the original JPEG byte stream directly into the PDF, without re-encoding. The PDF specification natively supports JPEG-compressed image streams. Done right, a JPG-to-PDF conversion has exactly zero quality loss. This guide shows you how to do it using any method available to you.
Why Re-Encoding a JPEG Destroys Quality
JPEG compression works by dividing the image into 8×8 pixel blocks and discarding frequency information the human eye is less sensitive to. This is a one-way process, once discarded, that information is gone. Re-encoding takes the already-compressed data, decompresses it (restoring the loss from the first pass), then compresses it again, adding a second layer of loss on top.
The result: block artefacts become more pronounced, fine detail softens further, and colour banding appears in smooth gradients. Even at quality 95 on the second pass, you lose data. A JPEG that has been re-encoded three times, original, converted to PDF, then compressed again, will be visibly degraded from the source.
| Generation | Operation | Visual Impact | Recoverable? |
|---|---|---|---|
| 1st | Original JPEG from camera or source | Baseline | N/A |
| 2nd | Re-encode during PDF conversion at Q85 | Slight softening on edges | No |
| 3rd | Re-encode again at Q85 | Visible softening, slight blocking | No |
| 4th | Re-encode at Q75 | Clear artefacts, blurred fine detail | No |
| 5th+ | Any further re-encode | Severe degradation, obvious blocking | No |
The Correct Method: Direct JPEG Stream Embedding
The PDF specification includes a native JPEG image stream type (DCTDecode). When a tool embeds a JPEG using DCTDecode, it stores the original compressed bytes directly, the decoder reads the JPEG data exactly as written by the original encoder. No re-encoding, no generation loss.
Here is how to do it in JavaScript using the open-source pdf-lib library, which handles embedding without recompression:
// Embed JPEG bytes directly into PDF, zero quality loss
import { PDFDocument } from 'pdf-lib';

const pdfDoc = await PDFDocument.create();
const jpgBytes = new Uint8Array(await file.arrayBuffer()); // original bytes

// embedJpg stores the original JPEG stream via DCTDecode, no re-encoding
const jpgImage = await pdfDoc.embedJpg(jpgBytes);

// Page sized to the image (PDF points = pixels at 72 DPI)
const page = pdfDoc.addPage([jpgImage.width, jpgImage.height]);
page.drawImage(jpgImage, {
  x: 0, y: 0,
  width: jpgImage.width,
  height: jpgImage.height,
});

const pdfBytes = await pdfDoc.save();Our Image to PDF converter uses direct JPEG stream embedding, your original JPEG bytes are placed into the PDF unchanged. You can verify this by opening the PDF and zooming in: it will look identical to the original image.
Page Size and Print Resolution
PDF page dimensions are specified in points (1 point = 1/72 inch). When you embed an image at its pixel dimensions and set the page to those same dimensions, the effective print resolution is 72 DPI, which looks excellent on screen but soft when printed.
To target a specific print size and DPI, scale the page dimensions to match. The formula is: page size in points = (image pixels ÷ target DPI) × 72.
| Print Size | Target DPI | Required Pixels (W×H) |
|---|---|---|
| A4 (210×297 mm) | 300 DPI | 2480 × 3508 px |
| A5 (148×210 mm) | 300 DPI | 1748 × 2480 px |
| Letter (8.5×11″) | 300 DPI | 2550 × 3300 px |
| A4 (210×297 mm) | 150 DPI | 1240 × 1754 px |
| Screen only | Any | Any, DPI has no effect on screen display |
If your source image is smaller than the required resolution for the intended print size, upscaling it in the PDF does not add real detail, the image will appear interpolated and soft when printed. Start from the highest-resolution source available.
Multi-Page PDFs from Multiple JPGs
For documents with multiple pages, scanned contracts, photo books, portfolios, the same zero-recompression approach applies across all pages. Each JPEG is embedded individually using DCTDecode. The resulting PDF file size is approximately equal to the sum of the original JPEG files plus a small amount of PDF container overhead (typically 10–20 KB regardless of page count).
// Multi-page PDF from multiple JPEGs, all embedded without re-encoding
import { PDFDocument } from 'pdf-lib';

const pdfDoc = await PDFDocument.create();

for (const file of files) {
  const jpgBytes = new Uint8Array(await file.arrayBuffer());
  const jpgImage = await pdfDoc.embedJpg(jpgBytes);
  const page = pdfDoc.addPage([jpgImage.width, jpgImage.height]);
  page.drawImage(jpgImage, { x: 0, y: 0, width: jpgImage.width, height: jpgImage.height });
}

const pdfBytes = await pdfDoc.save();
Converting PNG and WebP to PDF
PNG files are lossless, which means there is no "re-encoding" quality loss when embedding them into a PDF, the PNG data is stored as-is using the FlateDecode (lossless ZIP) stream type. The resulting PDF will be larger than a JPEG-based PDF, but pixel-perfect.
WebP is not a native PDF image stream type. To convert WebP to PDF, a tool must first decode the WebP to raw pixels and then re-encode as either JPEG (lossy) or PNG (lossless). Our Image to PDF converter encodes WebP sources to PNG in this step to avoid lossy re-encoding. You can also convert WebP to JPG first at your chosen quality, then convert to PDF.
How to Tell If a Tool Re-Encodes Your JPEG
There is a simple test: convert a JPEG to PDF and then extract the embedded image from the PDF back to a JPEG. Compare the file sizes. If they match (within a few bytes), the tool embedded without re-encoding. If the extracted JPEG is significantly different in size, it was re-encoded.
You can also open the PDF in a text editor or hex viewer and search for the string DCTDecode. If you find it, the embedded image stream is a direct JPEG. If you find FlateDecode or JPXDecode next to an image object, the image was re-encoded.
When to Intentionally Re-Encode
There are cases where re-encoding is the right choice. If your source JPEG is very large (a raw camera file or high-quality scan) and you need the PDF to stay under a size limit for email or a web portal, intentionally compressing the image before embedding is a deliberate quality trade-off, not an accident. In this case, use our image compressor to compress the JPEG to your target size first, then convert to PDF with zero additional re-encoding.
The Bottom Line
The difference between a good JPG-to-PDF converter and a bad one is whether it uses DCTDecode (direct embed, no loss) or re-encodes your image through an internal JPEG compressor. Always use a tool that embeds without re-encoding, and start from the highest-resolution source available for print use cases.
Our Image to PDF converter uses direct embedding for JPEG sources, your pixels arrive in the PDF exactly as they left your camera or scanner. For multi-page jobs, it handles batch conversion in one step.
Frequently asked questions
Does converting JPG to PDF reduce image quality?
What resolution do I need for a JPG to print clearly in a PDF?
Can I convert multiple JPGs into one PDF?
How do I convert a PNG to PDF without quality loss?
Why does my PDF look blurry when I zoom in?
Sources & references
This article was researched and written by Nikola, drawing on the following primary sources and documentation:
Ready to try it?
All tools run entirely in your browser, no uploads, no account required.
Image to PDF